
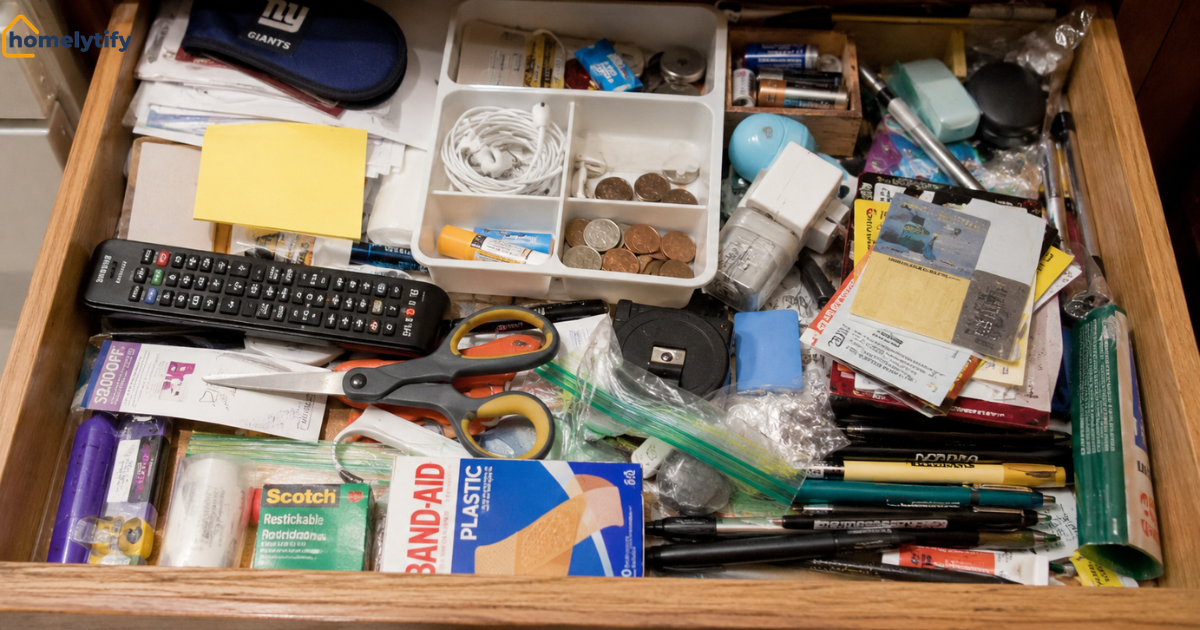
How to Organize a Junk Drawer: Simple Steps
Have you ever opened your junk drawer looking for something, such as a pair of scissors, some old batteries, rubber bands, or birthday candles, and found things you do not even remember putting there?
A junk drawer can be useful when you organize it properly. But it can quickly become a place where everything gets thrown in. When that happens, finding one small item can take much longer than it should.
The good news is that you do not need expensive organizers or a lot of time to fix it. In this guide, I’ll show you how to organize a junk drawer step by step. You can decide what to keep and use simple storage ideas to keep everything easy to find.
Why Does a Junk Drawer Get Messy?
A junk drawer usually gets messy because it becomes an easy place to put everything when you do not know where else to keep it. Over time, small items get mixed together, and some things stay there even though you do not need them anymore.
Another common problem is putting too many items in the drawer. When everything is packed together, even useful things become hard to find. You should give the drawer a clear purpose and remove items that belong somewhere else. This can make a big difference.
How to Organize a Junk Drawer Step by Step
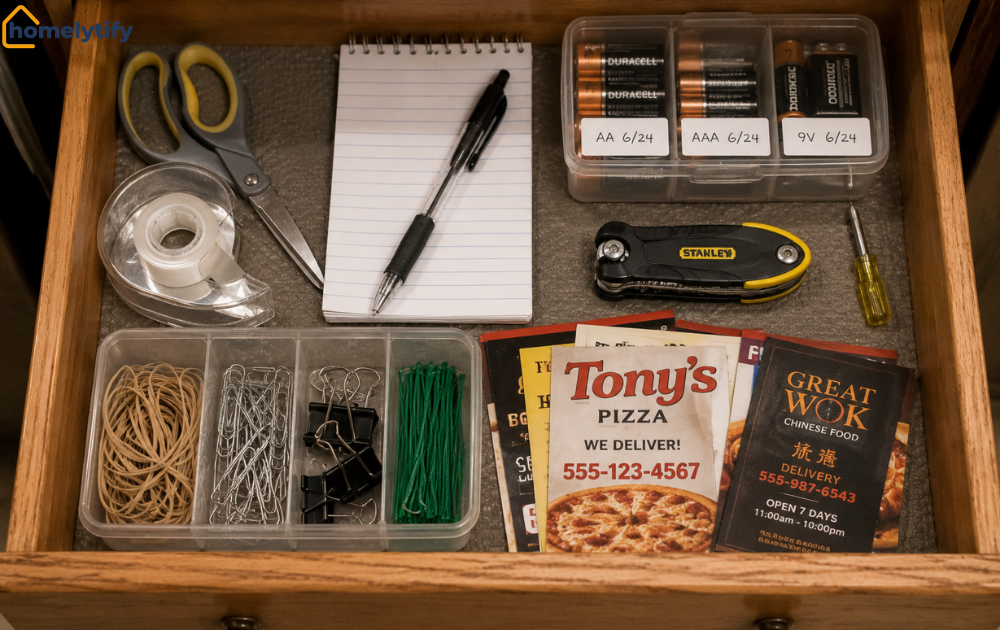
Once you decide what the drawer is for, organizing it becomes much easier. You do not need to buy anything before sorting what you already have.
1. Take Everything Out
Start by taking everything out of the drawer and putting it on a table or counter. Do not try to organize the items while they are still inside the drawer.
First, look at everything at once so you can notice duplicates, broken items, and things that belong somewhere else.
2. Sort Everything Into Groups
Make three groups: keep, move, and remove.
Keep the items you use or may need in the future. Move items that belong in another storage area or another room. Remove anything that is broken, useless, or no longer needed.
3. Clean the Drawer
When the drawer is empty, wipe it with a damp cloth to remove dust and crumbs. Let it dry before putting anything back.
Now is a good time to check the corners and back of the drawer, where small pieces of dirt can collect. Wipe these areas well before you put the items back.
4. Group Similar Items Together
Group the items you decided to keep. For example, you can put scissors and tape together, keep small batteries in one place, and put all stationery items together.
Do not try to create too many categories. The goal is simply to make each item easy to find when you need it. Keep larger items in your kitchen cabinets instead of trying to fit them into a drawer.
5. Put the Larger Items in First
Put the larger or less-used items in the drawer first. Then place smaller items around them so they are easy to see and reach.
You should leave a little space between groups instead of filling every empty corner. An overcrowded drawer can quickly become messy again.
6. Do One Final Check
Take a quick look before you close the drawer and make sure everything you put back belongs there.
I have a habit of doing one final check before I leave home or leave a place where I have been sitting, such as a park or a picnic with my family. Sometimes we can leave something important behind without noticing. When I look back before leaving, I often find something and take it with me, which saves me from unnecessary stress later.
I use the same habit when I organize my home, especially drawers and other storage areas. So, before you close the drawer, take one final look and ask yourself whether each item really needs to stay there.
If you are keeping something only because you might need it in the future, consider moving it to another suitable place. A junk drawer works better when it holds useful everyday items instead of things you rarely use.
What Should You Keep in a Junk Drawer?
A junk drawer is a good place for small items that you use often. You can keep them within easy reach. The exact items can be different in every home, so you should focus on what is useful for your family.
Items You Can Keep
Some common items that can work well in a junk drawer include:
- Scissors
- Tape
- Pens and pencils
- Rubber bands
- Small batteries
- Measuring tape
- Matches or birthday candles
- Small tools you use often
- Spare keys
- Safety pins
- Small clips or hooks
You do not need to put all of these items in the drawer. Choose the things that you actually use and that make sense to keep there.
Items You Should Remove
Remove anything that is broken, expired, empty, or no longer useful to you. You can also move items that already have a proper storage place somewhere else in your home.
If you are not sure about an item, place it in a small “maybe” pile while you finish organizing. You can decide what to do with those items at the end instead of keeping everything just because you are unsure.
Budget-Friendly Junk Drawer Organizer Ideas
You do not need to buy a special junk drawer organizer to keep small items in one place. Before buying anything, look around your home for small boxes, trays, or containers. They can do the same job.
Here are a few simple ideas to try:
- Use small boxes or trays.
Small boxes that you already have can be used to separate pens, batteries, clips, and other small items. You can cut them to the size you need if necessary. - Reuse an old cutlery tray.
If you have an extra cutlery tray that you no longer use, it can work well for a wider drawer. Its separate sections make it easier to keep similar items together. - Try small tins or containers.
Small tins or clean containers can be used for safety pins, rubber bands, or small clips. Choose containers that are easy to open so you can reach the items quickly. - Use jar lids as small trays.
Clean jar lids can be useful for keeping very small items together. They are especially useful for things that can easily get lost at the bottom of a drawer. - Add a non-slip liner.
Add a non-slip shelf liner to keep the items in place. This helps stop your containers and other items from sliding around whenever you open the drawer. You can cut the liner to fit the bottom of the drawer. - Add adjustable dividers if needed.
If your drawer is large or you have many different types of small items, simple adjustable dividers can create separate sections without taking up too much space.
How to Keep a Junk Drawer Organized
A junk drawer does not need a revamp every week. A few simple habits can help you keep it neat and clean.
- Give new items a proper place. Before putting a new item in the drawer, ask yourself if it really belongs there. If it has a better place somewhere else, put it there instead.
- Do a quick check once a month. Take a few minutes to remove extra or expired items that have collected in the drawer by mistake. This small check can prevent another big mess.
- Remove duplicates. If you already have the same item, keep only what you actually need. This leaves more space for useful things.
- Do not let the drawer become a catch-all. When you are unsure where something belongs, do not automatically put it in the junk drawer. Give it a proper place instead.
With these simple habits, you should not need to reorganize the whole drawer very often.
Conclusion
Organizing a junk drawer does not have to be a big project. Start by taking everything out, group the items you want to keep, and remove the ones you do not need.
You also do not need expensive organizers to keep it organized. A few simple containers or boxes can help keep small items in place. Once everything has a proper place, a quick monthly check can help you keep, the drawer useful and easy to manage.
Frequently Asked Questions
What should every junk drawer have?
Every junk drawer should have small items that you use often, such as scissors, tape, pens, rubber bands, batteries, and small tools. You do not need to keep all of these items in your drawer. Choose the things that are useful in your home and easy to reach when you need them.
What should I toss from my junk drawer?
You should toss broken, empty, expired, or useless items that you no longer need. You can also remove duplicates and move anything that has a proper storage place somewhere else in your home. If you are unsure about something, keep it aside and decide later.
What can I do instead of having a junk drawer?
Instead of having a junk drawer, you can give small household items a proper place in different drawers, cabinets, or small containers. For example, keep batteries with other batteries and stationery with other stationery. This can make it easier to find things without keeping everything in one drawer.
What can be used as drawer dividers?
You can use small boxes, old trays, clean containers, or even pieces of cardboard as drawer dividers. These simple items can separate different groups and keep them from mixing together. Choose options that fit your drawer and do not take up too much space.
How can I organize a junk drawer without buying anything?
You can organize a junk drawer by using things you already have at home, such as small boxes, jar lids, tins, trays, or clean containers. First, take everything out, remove items you do not need, and group similar items together. Then use these household items to create simple sections inside the drawer.
3 Comments